My wife and I recently redid our sunroom gym. We ended up with a package of an Ironmaster Super Bench, Dip Attachment, Crunch/Situp Attachment, along with getting the Chin Up Attachment separately.
I’m a huge Ironmaster fan now, after this experience – and I hope this review helps you make a decision when outfitting your own gym. We'll look at the bench and attachments, then some exercises you can use on the equipment.
A Review of The Ironmaster Super Bench
Let's skip right to it - this is a very good home bench, and certainly one of the best you can buy without going commercial.
Other than a few mild hangups (which I'll discuss), this rivals anything on the market. With a half a ton weight limit in the flat position, and 600 lb limits on the 10 (!) non-flat adjustments, you will never have to buy another bench.
(Well, most of you, anyway).
Ironmaster Super Bench Dimensions and Stats
Now to the main details: there are 11 adjustments you can make to the bench:
- Flat
- 5°
- 10°
- 20°
- 30°
- 40°
- 50°
- 60°
- 70°
- 80°
- 85°.
My bench is 20.5" from the floor to the top of the padding. Like other reviews have noted, the padding is easier to compress than other benches - so you're looking at roughly 20" from the floor while you're on it.
(For the record, I'm 5'10" with a 30" pant inseam, and I am able to put my feet flat on the floor for leg drive during chest exercises. For those who can't, I'd suggest 2x# (4 or 6 maybe?) dimensional lumber pieces on their side, or using 45 lb olympic plates - assuming they're not all on the bar!). If you're around the same inseam and can't reach, as you gain hip flexibility you'll probably be able to use it flat footed as well.
The width of mine is a hair over 10 1/4", and the length is exactly 44". The footprint of the bench is around 18 3/4" wide.
The padding was a touch narrow the first time I did flat chest exercises - the compressive padding and the width forces you to keep your scapulas retracted in pressing and fly exercises - which you should do anyway.
Using the Ironmaster Super Bench to Exercise
I use the bench at around the 30° or 40° setting to do chest supported rows with 18" spinlock dumbbells (this set here on Amazon). You're probably better off (especially if you have a smaller wingspan than me) with a slightly shorter spinlock of 12-16" to avoid hitting the back of the bench.
For me, 18" is still manageable - for reference, my dress shirts are all around 34-35" sleeves, and I've got a 72" wingspan. You could also use Powerblock Adjustable Dumbbells, Bowflex Adjustable Dumbbells, or Ironmaster's own adjustable dumbbells (or pro set) to have shorter weights at home.
Stability is great on this bench - make sure you follow the instructions that come with the bench in terms on tightening. That goes too for the attachable seat - there are three places you can put the seat, but for my measurements, the top setting is best for when the bench is in the 80° or 85° setting. While doing incline exercises (I aim for 30° on my DB incline press) I use the lowest setting.
If you end up purchasing any of the attachments (other than the crunch/situp attachment), you'll be using the 85° setting quite a bit.
I actually find the 80° setting works best if you have some sort of a weight attachment in front - either a chest harness or dipping belt. If you are using a backpack with weights or a dedicated weighted vest, the 85° setting will work fine - just splay your legs around the half crescent if it gets in the way. More details are in the reviews of the dip attachment and chin up bar attachment below.
More details are in the reviews of the dip attachment and chin up bar attachment below.
Summary
An excellent purchase! While the bench may be a bit tall for some with shorter inseams, the stability and support are unimpeachable. If you're in the market for a small footprint bench with a ton of attachments, I can highly suggest the Ironmaster Super Bench.
Get Yourself the Ironmaster Super Bench!
The Dip Attachment
The dip attachment is an excellent piece of equipment, and definitely is a must buy for the Ironmaster Super Bench.
That said, there are a number of issues with the dip attachment's interaction with the half-crescent adjustment bar if you use a lower setting and/or have very long legs. You will likely also have issues if you use dipping belts.
Tips and Tricks for the Ironmaster Super Bench Dip Attachment
Using it a few times, I've developed some workarounds for any awkward crescent hitting:
First, you'll want to skip the front loading dipping belt (if you haven't bought one yet). Replace it with a weighted vest, a backpack with weights, or a dipping belt which allows you to attach weights in the back. An excellent way to make a weighted vest is to buy a cheap climbing harness and strong caribiners, along with lengths of chain from the local hardware store.
Second, use the dip attachment adjusted as high as your wingspan, ceilings, and ability to get onto the attachment allow.
Third, if you still have problems with your weighted dips, I've had success not using the 85 degree setting, but using the 80 degree setting. That single click makes a huge difference; with good form you might be able to bring the dipping belt back into play. This setting seems ideal for my weighted dips setup - for both chest dips and tricep dips.
Fourth, if necessary, straight dips (triceps) can be done facing the opposite way from the bench with legs splayed. Since your weights will now be in the front, you can use your dipping belt. This isn't the best setup in the world, but it works in a pinch.
As for stability - you can certainly get the bench rocking with sloppy form - but, seriously, even if not rock solid it inspires plenty of confidence while you grind out a set. In terms of tricks you can do with it - since it is reversible, you can flip the dip attachment over to support yourself while using the... well, bench side of the Ironmaster Super Bench. Also, due to the location of the screws, you can also get the dip attachment stable without inserting the attachment pin into an actual hole - opening up the shortest distance from the floor possible with the attachment (but certainly not suggested by Ironmaster!).
Summary
Definitely an A+ attachment, and if you get an Ironmaster Super Bench and don't have a go-to dipping station elsewhere, you need to put this thing in the cart.
Grab yourself an Ironmaster Super Bench Dip Attachment!
The Chin Up Bar Attachment
I'd rate the pullup attachment as a good (rather than great) attachment.
Don't get me wrong - it's well engineered and quite solid It sports a weight limit of 300 lbs (80 lbs more than the doorbell pullup bar it replaced).
However, due to the attachment's weight, 47" width of the bar, and 48" height of the bar, it's awkward to install and remove, and can get a bit wobbly during the set. It'll move left to right if you're sloppy, but you'll also spring front and back a fair amount (At 180 lb current body-weight, but more pronounced with heavy weights attached).
With practice, I've gotten better at the removal part - when you count five holes while you're sliding the attachment out, go slowly as it's about to come free.
The grips are very good, on both the straight branches and further out to where the bar is bent. For me, I do chin-ups with a closer grip, and the straight bars interfere a bit with my neutral shoulder grip position. Also of note - there is no grip in the center section by default; you might want to add something if you do shoulder width chins like me.
If you are particularly tall or use the bar with a lower ceiling, you might have interference problems with a dipping belt.
However, this is less of a concern than with the dip attachment. Like the dip attachment, you can use the bar at 80 degrees instead of 85 degrees to avoid most of the problems.
Please see the dip attachment section for all of the weighted exercise workarounds. With pull-ups, backpacks are an excellent way to load weight... assuming you fit in the limit!
Summary on the Chin-Up Attachment
Let's grade it a B - the engineering is great, and once you add grips and figure out the weighted chins situation, you'll have a very nice and reasonably easy to hide pull up bar.
I would get this attachment third, after the dip and crunch situp attachments.
Get Yourself the Ironmaster Super Bench Chinup Attachment!
The Crunch Situp Attachment
In summary: get it!
This is the perfect synergist for the Ironmaster Super Bench, and it is necessary for you to do decline exercises without, say, forcing a spotter to hold your ankles. Since you're working out at home, you probably don't have a spotter - so grab this piece instead.
There isn't much to say about the attachment itself - it's under 10 lbs and easy to install and uninstall. It trumps the dip attachment for the number of adjustments with six... and since it's used horizontally, you can hack a seventh position by pushing it in all the way and tightening the bench's pin (not Ironmaster approved!).
It has a single protruding handle to the dip attachment's 2 protruding handles. This will allow you to use your hands to stabilize yourself when doing various leg maneuvers for your core.
Tips and Tricks for the Ironmaster Super Bench Crunch Situp Attachment
How to do Hyperextensions on the Ironmaster Super Bench
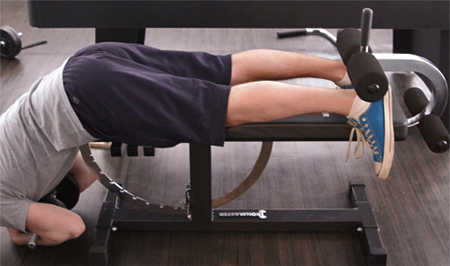
I saw a rumor that some folks had figured out how to do back hyperextensions using this attachment - but I couldn't figure out how to do them until I started playing with the 'seventh' position (fully inserted) I mentioned above.
First set your Super Bench in the flat position, and adjust the crunch situp attachment so that you can't slide it any further into the attachment acceptor.
If you have long enough legs (again, I'm about a 30" inseam), you're now ready for hyperextensions - jam your toes or ankles under the pad on top of the bench, and lay the opposite direction of the attachment.
Depending on your proportions, you should be able to get your waist to fall right at the edge of the bench - pin a weight to your chest and do back hyperextensions!
So, you can replace a flat bench, decline bench, seated bench, incline bench with this attachment and the Super Bench. You can replace a Roman Chair to boot if your legs are long enough!
Get the Ironmaster Super Bench Crunch Situp Attachment!
Summary
Another A+ attachment - you should get this with the Ironmaster Super Bench.
Storing the Ironmaster Bench and Attachments
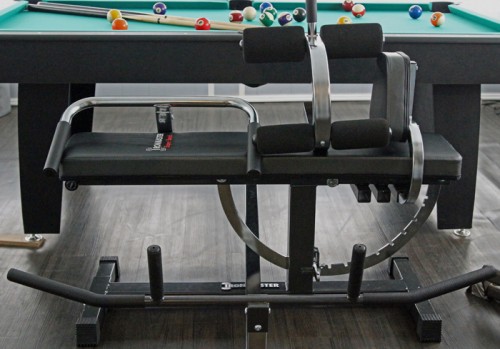
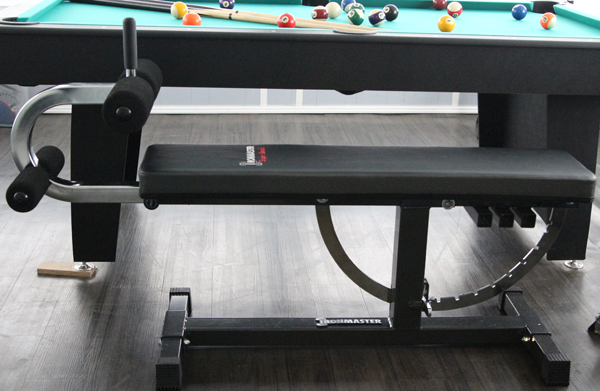
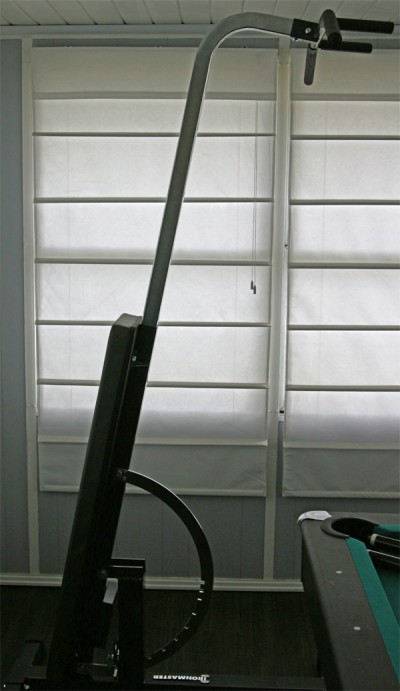
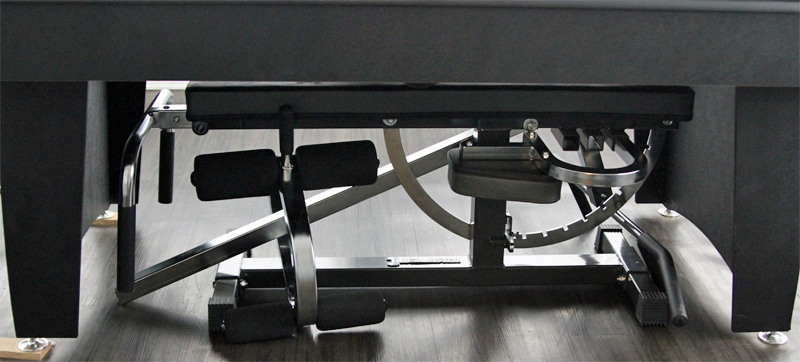
Safe to say, this is an improvement over our previous setup... all of the pieces fit rather neatly under a 7' pool table:
Accessories for the Attackments and Super Bench
Aside from pull-ups, chin-ups, and back extensions (as illustrated above), you're going to quickly outgrow bodyweight exercises. You'll want to pick up some weights to go with it.
I'm biased towards an adjustable option; here's a few with reasonable weight caps.
Adjustable Dumbbells Perfect for Use with the Super Bench
- Powerblock Adjustable Dumbbells (Max: 130 lb)
- Bowflex Adjustable Dumbbells (Max: 95 lb)
- Ironmaster's own adjustable dumbbells (Max: 120 lb, or custom 165) I've never tried these, but have heard great things - plus you'd have a matching set with the bench, heh.
- Spinlock Adjustable Dumbbells (Max: ???)
If you have some sort of spotting stand or rack, you'll have to research the < 7' options to see if they'll fit.
Body-weight Assitance
- Chest Climbing Harness and Caribiners
- Loading Pin (or use chains)
- Dipping Belt (Or IronMind's "SUPER SQUAT" belt, which has front and back attachment)
Ironmaster's Super Bench - Conclusion
You guessed it - my wife and I are very happy with the purchase, and we love the Ironmaster Super Bench.
Get an Ironmaster Super Bench Today
See it on Amazon
The few compromises aside, I know we're happy with the purchase and can definitely recommend it for anyone trying to set up a gym in their house.

