
The Psion Series 3 was a palmtop computer first released in 1991. It sported a 240 x 80 monochrome screen and ran SIBO (a 16-Bit Operating System) on a variant of Intel's 8086 processor. The Psion Series 3 was successful enough to spawn a number of successors - the Psion Series 3a (1993), Psion Series 3c (1996) and the Psion Series 3mx (1998).
Why is a Psion relevant today?
I happen to have a working Psion 3a in reasonable shape. I decided to figure out how to connect it to the internet. Follow along and we'll go over making the physical connections, loading software on your Psion, preparing a Raspberry Pi as an internet bridge, and finally surfing the web with the Psion Series 3a.
Is getting a Psion on the internet useful?
Useful? Probably not, but if you've got a member of the Series 3 family in your closet maybe it'll be fun.
Loading PsiMail Internet onto Your Psion Series 3a
As far as I know, the only browser (and completed TCP/IP stack?) for the Series 3 family of Psions was part of Psion's own PsiMail Internet. Download yourself a copy; you can grab it from Steve Litchfield's excellent archive here.
You'll also need a way to load PsiMail onto your Psion - so you'll need a way to move it from your computer to the palmtop.
I tested two methods:
- plptools, which you'll have to compile yourself on a *NIX box
- PsiWin 2.3.3, Psion's last release of the Windows connectivity software.
Using plptools's plpftp you could probably do it, but frustration with the wildcard support drove me to PsiWin's "simplicity". Of course, simplicity is relative nowadays; PsiWin doesn't play nice with 64-bit operating systems.
Luckily for me, I have Windows 7 Professional on my desktop. That gave me the license to XP Mode, Microsoft's Windows XP in a box. I used Virtualbox as my emulator; you can find instructions for the combo here. All of the PsiWin steps I performed in the emulator, but many are beyond the scope of this tutorial.
If you have a 32-bit operating system - that's great... for this hack. Outside of the guide, it might be time to consider a new computer (but hey, engineers are biased on this front - don't ask me).
Making a Hard Connection (Example for PsiWin)
Whichever method you choose, you'll need to link your Psion to a PC. The Psion Series 3a does not have an IR port, so that means you will need a hard connection.
The so-called 'Soap on a Rope', or Psion 3Link is what you'll need for a Series 3 or 3a (I somehow have a couple). If you've got one of these Psions, you probably have one - if not, you can still grab one from Pulster. Or, you know, try sniping one off Ebay.
Depending on the age of your PC, you'll also need a USB to DB9 serial converter. For this step I was successful with one using a Prolific chipset. Here is one on Amazon (the exact one I used is discontinued, this one is untested but is likely fine!). Be sure to install the driver in either XP Mode or your 32-bit operating system. Prolific's driver can be found here.
Then, either inside XP Mode or inside your operating system, get PsiWin to connect to the Psion. Use the application 'Install New Program' and install PsiMail Internet on your Series 3.
Congratulations - since that's probably the first time you've used your Psion in years (okay, I'm projecting!) you're ready for a break. Next we'll use a more modern part to work as an internet bridge for our Psion.
Preparing a Raspberry Pi as an Internet Bridge
For a hacker, is there anything more versatile than a Raspberry Pi? They're cheap enough to be built into projects, and have just enough horsepower to do most of what you need. Even when they lack power for an application, they're still useful for learning... say, like for learning how to set up a Hadoop cluster.
Today we'll use a Raspberry Pi 3 (grab one from Amazon here) as a bridge. You can use whatever is handy; I like the Pi 3 for this project because it has built in wi-fi.
Get the most recent version of Raspbian installed. I used a NOOBS distribution, then updated the Pi like this:
sudo apt-get update && sudo apt-get dist-upgrade
You'll then need to install everything we need for 'ppp', which is what we'll be using to make the internet connection over our serial connection. Here's how I installed everything:
sudo apt-get install ppp
# ‘Y’
sudo apt-get install pppoe
# ‘Y’
If you look in /usr/sbin/, you should now see pppd - that's what you'll need.
Making a Hardware Connection to the Pi
I used a second USB to serial converter for this step, as I wanted to leave the other adapter plugged into my PC. I used this short USB to serial adapter, which has an FTDI chipset. The Pi didn't require any driver installation.
You should see a new tty device show up; for me, the adapter showed up at /dev/ttyUSB0
(If you want, you can try hooking up the Psion and use the COMM app on the Psion to talk to screen or minicom on the Pi.)
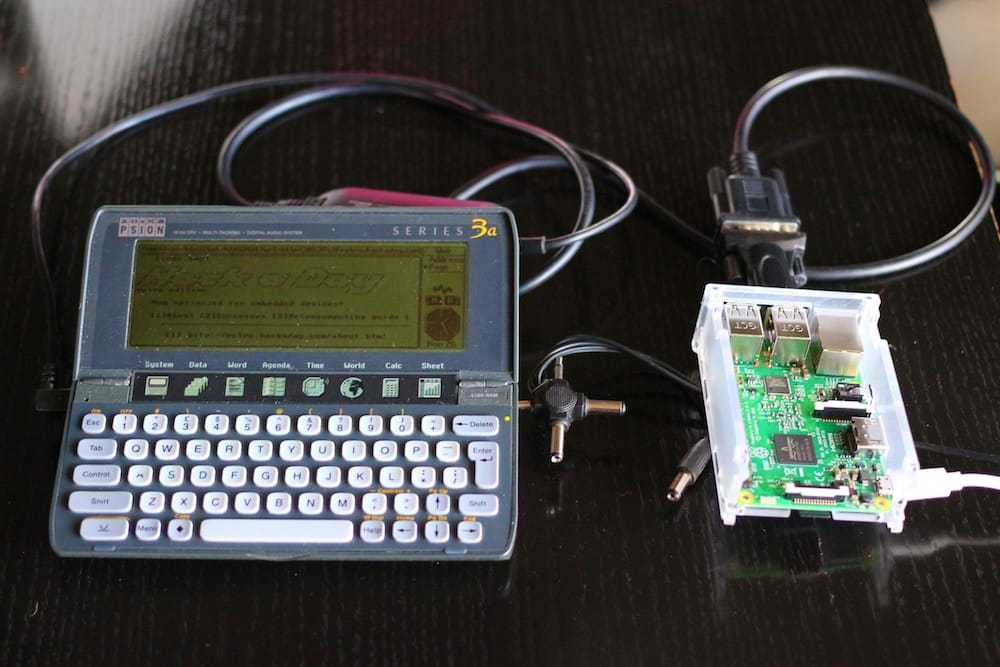
Our Final Connections (Click to enlarge)
Using PPP to Bridge the Internet from the Pi to the Psion
ppp is a very useful application outside of our narrow scope today - it gives a way to share the internet from a working device. (Here's an interesting example demonstrating how to use a Pi as a wireless card.) Today, we'll use ppp to assign an IP address to our Psion, and pass along a DNS server (routing itself is a different step).
Our script today is based on a Palm Pilot script from Atul Chitnis, which seems to have gone offline around 2012. Note that you should change the variables below to match your own environment. You'll want to copy/paste part 1 into the terminal... and save part 2 for after you get a successful connection:
After running part 1, you'll get a message like this:
Using interface ppp0
Connect: ppp0 <--> /dev/ttyUSB0
... and the program will sit and wait. That's what we wanted - let's get the Psion set up.
Connecting Your Psion Series 3a to pppd on the Raspberry Pi
On the Psion side, you'll want to go into the 'Setup' Application in the Internet Group. We'll go in order through the settings I used to successfully connect:
- Provider
- Service Provider = 'Other'
- Communications
- Modem Settings
- Modem Settings For = 'General'
- Initialisation String = 'AT'
- Hangup Time (secs) = 10
- Port Settings
- Speed = '9600' ('19200' might work with a script change, but was too unreliable for me).
- Handshaking
- Xon/Xoff = 'Off'
- Rts/Cts = 'On'
- Dsr/Dtr = 'Off'
- Dcd = 'Off'
- Port = 'TTY:A'
- Modem Settings
- Setup
- Provider Settings for 'Other'
- Server Settings
- Protocol = 'PPP'
- DNS = '192.168.1.1'
- Account Settings
- Login = '' (blank)
- Password = '' (blank)
- Confirm password = '' (blank)
- IP address type = 'Static'
- IP address = '192.168.99.2'
- Connection Script (hacky but seems to work often enough)
- Retry script 99 times
- Open network connection
After all of that, try 'Connect'. You may need to close pppd a few times on the Pi side and run Connect a few times, but eventually you should see:
local  IP address 192.168.99.1
remote IP address 192.168.99.2
and an error message about email on the Psion. Once you're there you're golden! Now paste and run the second part of the above script on the Pi side.
Surfing - and Working Around Limitations - On a Psion Series 3a
Exit the Setup application, but leave it running - use the 'System' hotkey on the keyboard. You're now ready to open up 'Web', the only browser ever made for the Psion Series 3.
Assuming it's your first time, it'll open some local html file. To surf to Google, do this:
- Menu -> Get Page -> 'http://google.com'
Working Around Web's Limitations
Web is, suffice to say, a very old browser. It's also, surprise surprise, not standards compliant to HTTP 1.1. Most problematically, it doesn't send the HOST header field; when it finds an IP address from DNS it'll try to surf to that IP. (Which is valid HTTP 1.0, for what it's worth).
Some sites reject the browser instead of falling back to HTTP 1.0. Many sites with non-standard ports or shared hosting fail outright. Other sites listening on port 80 on the IP found by DNS do work, however. We'll exploit this fact and use a text browsing proxy from W3C to complete this demo:
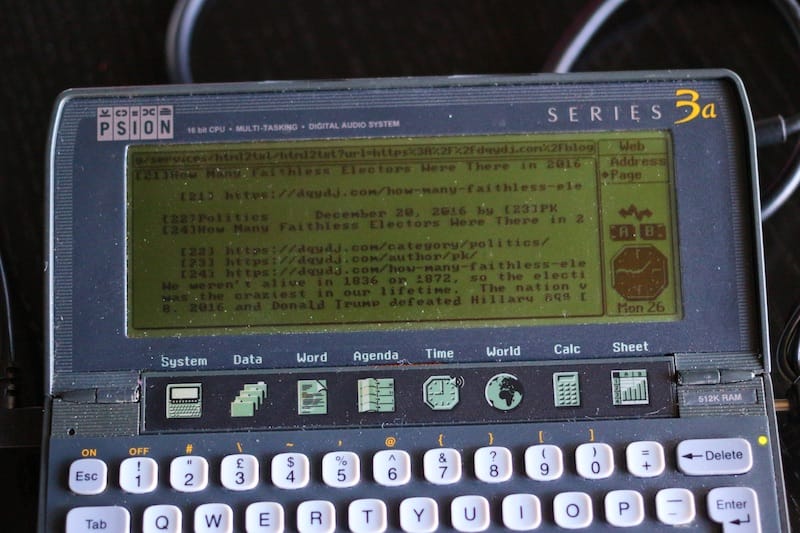
Surf to (Menu -> Get Page): https://www.w3.org/services/html2txt
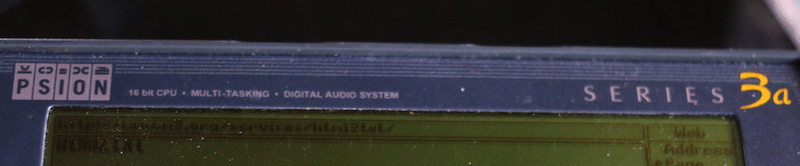
Enter a url... we suggest https://dqydj.com/blog/ or http://retro.hackaday.com, and use tab to select 'Convert from HTML to Text'. Hit the 'Enter' key and wait... if you are successful, you'll see the below. First, DQYDJ's blog summary page:
2016 Redesign on a 1993 Computer...
... and Hackaday's retro site:
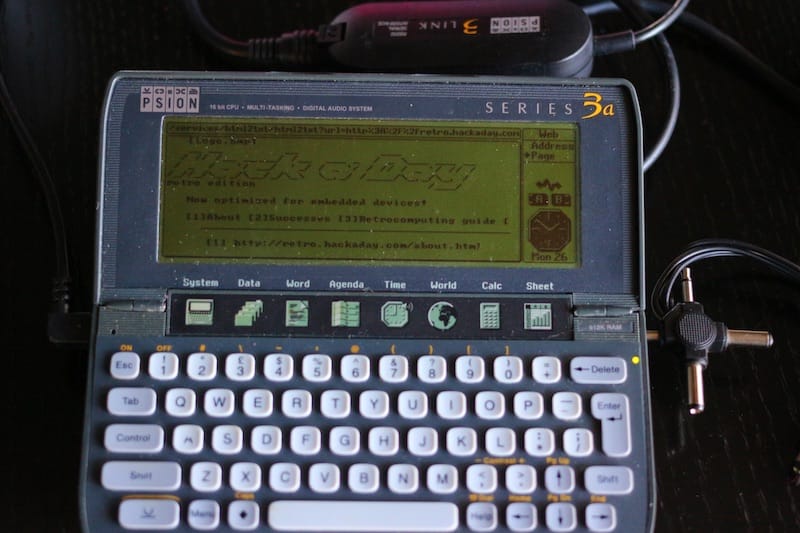
Hackaday's Retro site, retro.hackaday.com!
Hacking the Psion
Does this make the Psion useful as a websurfing device? Certainly not... especially since you'll have to pass most sites, including all secure sites, through a proxy.
Still, you've got to admit it's a neat hack. Isn't it great to see a computer from the early 90s on today's web?
